Build Your Own AdamAmp II!
Here's a parts list so you can build your own version of the famous AdamAmp II (A name I've given it) 60FX5-based amplifier the from parts you can buy from Antique Electronic Supply (AES) and Radio Shack. Note that since I used some surplus parts, the amplifier you build may be more expensive than mine. Any differences in parts I used from those found in the Antique Electronic Supply will be noted. UPDATE: I have found my 2000 Radio Shack catalog, and am now able to give catalog numbers for their in-store parts!
DISCLAIMER: Please be careful when building this or any other vacuum tube amplifier. I assume no responsibilities for any accidents that may occur while building this or any other amplifier. There are high voltages involved. If you haven't worked with vacuum tubes before than please work with caution. Do not put your hands underneath the chassis while the amplifier is plugged in (I found this out the hard way; fortunately it was only 120 volts). Have fun, but please build at your own risk.
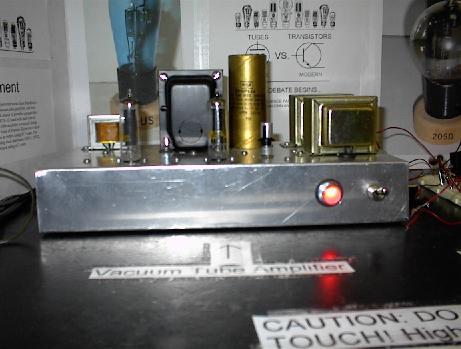
A photo of my finished product
NOTE: Prices are subject to change without notice.
Tubes: Two (2) 60FX5 vacuum tubes. AES# T-60FX5 $3.15 each
Tube Sockets: Two (2) 7-contact miniature tube sockets. AES# P-ST7-205 $0.35 each
Power Transformers: Two (2) Radio Shack 3-amp 120 volt to 12.6 volt transformers. RS# 273-1511 $9.99 each
Output transformer: One (1) Hammond 1608 10-watt 8,000 ohm primary impedance push-pull transformer. AES# P-T1608 $36.82
Input Transformer: One (1) AES PT-157 nickel-core audio interstage transformer. AES # P-T157 $15.95 (No longer available; use P-T156 instead)
Capacitor: One (1) Aero M multisection capacitor; has two 100 microfarad sections rated at 500 volts each. AES# C-EC100-100-500 $24.95 (You could also use two (2) 100 microfarad 350 volt axial-lead electrolytic capacitors instead. AES# C-ET100-350 $2.25 each)
Chassis: Hammond aluminum 12 inches wide by 8 inches deep by 2 inches high chassis. AES# P-H1444-22 $18.20 (I used a 12 by 6 by 2 chassis I had custom-made my the metal shop at my school.)
Rectifier: (1) 8 amp 400 PIV silicon bridge rectifier. AES# P-QBR-84 $2.50 (The schematic calls for s 4 amp 400PIV silicon bridge rectifier; 8 amp 400PIV is the closest thing AES has.)
Resistors: (2) 47 ohm .5 watt carbon-film resistors. AES# R-A47, 5pcs $0.40 (AES sells non-power resistors in bags of 5) (I used carbon-composition resistors for a classic look. AES# R-I47, 5pcs $1.00)
(1) 220 ohm 1 watt carbon-film resistor. AES# R-B220, 5pcs $0.70 (AES doesn't carry 1 watt carbon composition resistors; I found mine surplus.)
Power Resistors: (1) 300 ohm 5 watt power resistor AES# R-Q300, $0.40 and (1) 30 ohm 5 watt power resistor AES# R-Q30, $0.40 (AES doesn't stock a 330 ohm 5 watt power resistor, so wire these in series; I had to do this as well using surplus resistors.)
Potentiometer: (1) 25 ohm, 2 watt linear (?) potentiometer (Unfortunately, AES doesn't stock a potentiometer of this value. However, Radio Shack has a 25 ohm, 3 watt rheostat which should work. RS# 271-265B $3.49. Radio Shack also lists a 20-ohm, 5 watt linear potentiometer in their "commercial catalog," which will also work. It costs around $3 plus $2 shipping. Look under potentiometers in the commercial catalog.)
Fuse Holder: AES# S-H258 $1.75 (Wire between "hot" side of power cord and one of the terminals on the switch; use 1 amp fuse, AES# F-ZF010 $2.50)
Switch: SPST toggle switch. AES# P-H35 $3.00 (although any SPST toggle switch will work; wire it between the fuse holder and the primary of the first power transformer.
Indicator Light Holder: AES# P-L110 $3.95 (Wire between one of the secondaries of the transformer and the center tap [see power supply schematic]. Use type 47 lamp AES# P-47 $3.50 [for 10] and lenses [fluted dome-red: AES# P-111 $1.75; fluted dome-green: AES# P-112 $1.75; jeweled red: AES# P-115 $2.25; jeweled green: AES# P-116 $2.25; jeweled amber: AES# P-117 $2.25])
A schematic can be found here.
A schematic for the power supply can be found here.
A chassis layout diagram can be found here.
Scans I made of the articles I built this amp from can be found here: Page 1 Page 2 Page 3
Note: These pages will take a long time to load.
If you've built your own version of the AdamAmp II, e-mail me with your results and/or pictures using the address below! Have fun!!!
-Adam
Go back to my main tube amp page!
Go back to my main page!