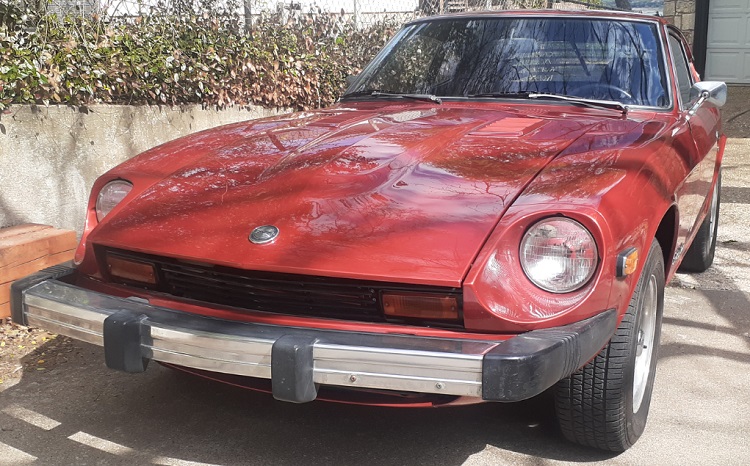
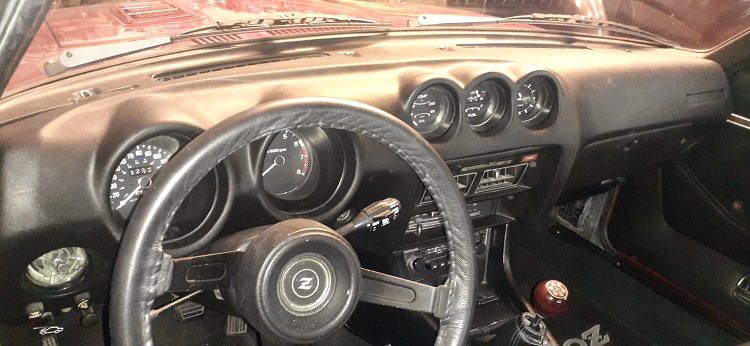
1978 Datsun 280Z
Return to Home
Return to Resources
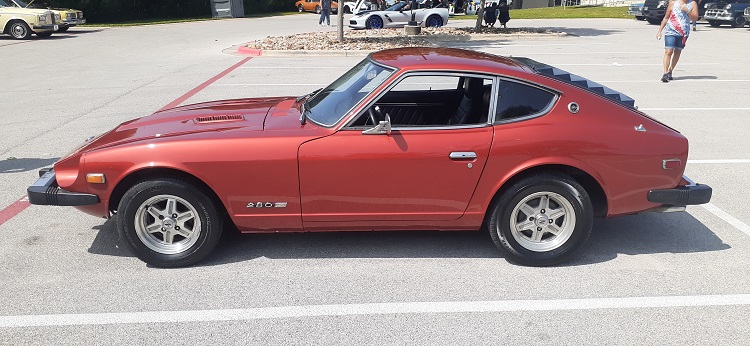
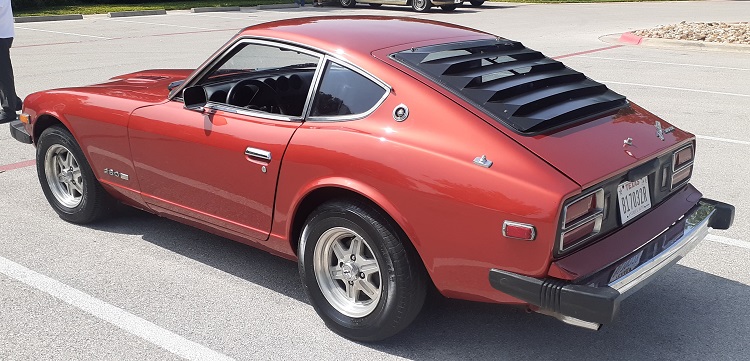
Here is my 1978 Datsun 280Z painted in 2015-2017 BMW Sakhir Orange B50.

I had long admired the first generation Z car and styling. I had my opportunity to buy one in 2012 and have enjoyed it ever since. There is a lot of information in various Z forums about repair and maintenance of these cars. My notes presented here are a combination of my own experience, information gathered from forums, and knowledge absorbed from a longtime experienced Datsun repair technican.
I had several subtle and strange performance problems with my 280Z that I've learned how to resolve and hope the information shared here is helpful in some way. The factory service manual has some helpful guidelines, but what really helps is knowing where to look. First of all, a properly performing 280Z engine should run smoothly and purr. It should not shake, make popping noises, shudder or run rough. Acceleration should be smooth and deliberate as you would expect from a 170HP engine like a modern car today. Anything but this is a symptom of problems.
Body work and repaint
Read more on the repaint story here: 1978 Datsun 280Z repaint.
Idle flutter or shudder
In the first 9 years that I owned my 280Z, it always had a mysterious idle flutter that was most noticable when the engine was fully warmed up. When properly set, the base idle would be about 800 RPM then after a few seconds usually after a deceleration, it would drop to 400-500 RPM causing the car to shake and sometimes even kill the engine. Otherwise while shaking for a few seconds the idle would pick back up to 800 RPM like nothing happened. It would alternate back and forth between the low and normal idle every several seconds. This is NOT normal.
One thing that the factory service manual neglects to mention as a possible cause and was the culprit in my case are miswired fuel injectors! My #1 and #3 injectors happened to be crossed as well as the #4 and #6 injectors. If you suspect the previous owner had some work done then assume nothing of their work and verify everything. Apparently crossed fuel injectors does not always caused such a severe performance detriment to be noticable unless running at idle. The engine operation does sound different before and after, but if you have never seen or heard a properly operating 280Z then there is no point of reference to compare. After fixing this problem, the engine idles perfectly and rock solid at 800 RPM without an iota of a flutter.
Engine performance issues
If the Z suddenly developed these issues then something failed. But if it had performance issues when you bought it then likely you're inheriting problems that a previous owner may have caused rather than actual old age wear and tear. If that is possibly the case then assume nothing of the previous owner's work and check the "obvious" easy things first before diving into harder and more expensive repairs!
- If the engine does not run, check that you have a spark? Use a spark tester. Install new spark plug wires and distributor cap. If there is an electrical problem causing a lack of spark then check your fuses and especially the fusible links for continuity and clean any corroded connections.
- If the engine runs poorly with rough idle or stalls:
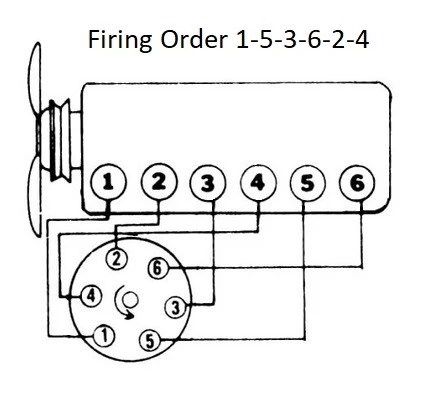
- Check the spark plug wiring and order against the factory specs. I have seen simple things like this screwed up before. The firing order is 1-5-3-6-2-4 counterclockwise on the distributor cap with #1 marked by a vertical line on the distributor cap.
- Check engine timing with a strobe. Disconnect the vacuum advance to the distributor and check that engine timing meets factory specs (around 8 to 10 degrees BTDC for 1978).
- Check all vacuum lines for leaks. The charcoal canister purge valve, BCDD valve, distributor advance, EGR, climate controls, etc. have vacuum actuators and diaphrams that may have developed a leak. Use a vacuum gauge and/or a hand pump to test each item.
- Consider deleting the EGR and BCDD valve if they are leaky. The BCDD only helps cut down emissions when your foot comes off the accelerator rapidly causing the engine to momentarily run rich due to the throttle valve closing rapidly. Neither helps with normal operation or performance.
- Check the spark plug wiring and order against the factory specs. I have seen simple things like this screwed up before. The firing order is 1-5-3-6-2-4 counterclockwise on the distributor cap with #1 marked by a vertical line on the distributor cap.
- If the engine runs but feels like you have to get out to help push it on acceleration then perform a valve adjustment to ensure the engine is breathing correctly. Mine had badly misadjusted valves when I experienced this problem.
- If the engine is still running rough or has surging, uneven power on acceleration then it's almost surely a fuel delivery issue especially if the car has sat for a number of months without running. But another potential and subtle cause could be intermittent electrical problems. Be sure to refer to the Fusible Link section.
- Replace fuel pump located under rear right wheel well and fuel filter on right of engine compartment. Low fuel pressure could be due to a weak or clogged pump.
- Make sure the vacuum line to the fuel pressure regulator on the injector rail still holds vacuum. Use a vacuum hand pump to test.
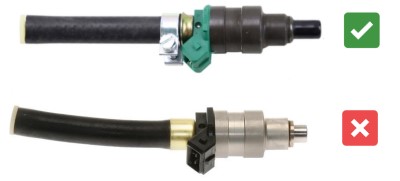
- Replace or clean fuel injectors. Be sure to use high quality injectors that have a longer tip like Beck/Arnley 1550016. There are cheaper alternatives like the Standard FJ707 with a shorter injector tip that "work" but doesn't necessarily atomize the fuel efficiently. Cheap injectors may cause slight popping noises due to poorly atomized fuel not burning completely. The Z repair technican has often taken more of the cheaper injectors than he has put in.
- The fuel pick up in the fuel tank could have clogged. I had trouble with intermittent hesitation on acceleration due to a constricted fuel pick up. This was likely caused by the car sitting for years with little use. The Z repair technican mentioned to me that he has had to drop the tank and clean out the pick up on almost every single Z that comes in his shop with acceleration performance issues. He says sometimes this involves cutting a hole above the center baffle to manually clean off the end of the pick up so he sends it off to a local radiator/fuel tank repair shop.
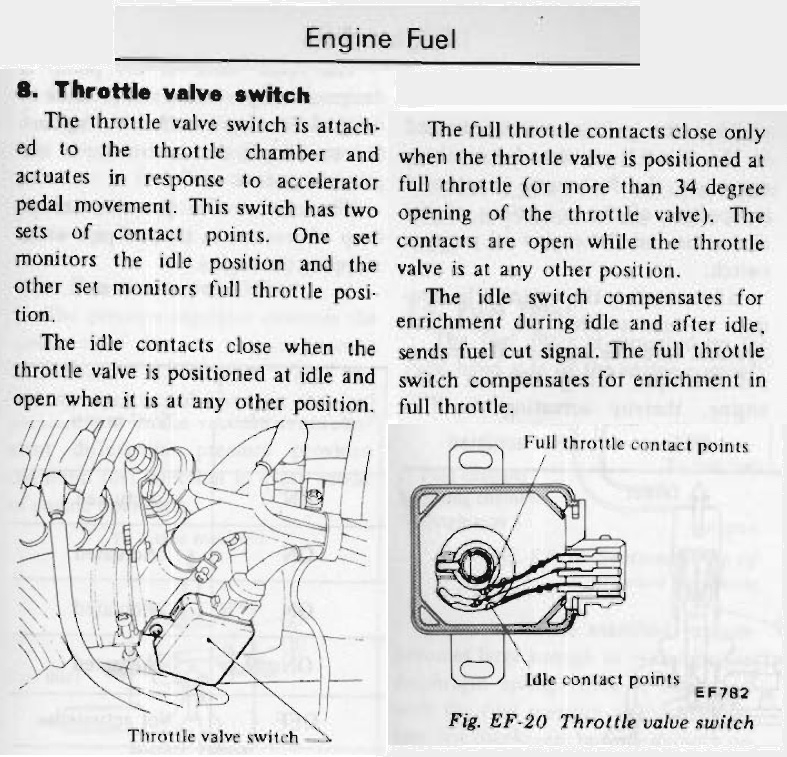
- For fuel injected 280Z engines only, if the engine is running rich and the exhaust smells sooty then check the TPS (Throttle Position Sensor) also known as the Throttle Valve Switch in the factory service manual. Sometimes the switch sags over time and makes contact causing the ECM to think the car is in WOT and continuously dumps fuel. Remove the plastic cover and use needlenose pliers to bend the switch contacts back to the correct positions and ensure it makes the expected contacts as the throttle moves. There are 3 positions that the switch senses - idle, cruising, and WOT. This adjustment should be made with the engine turned off.
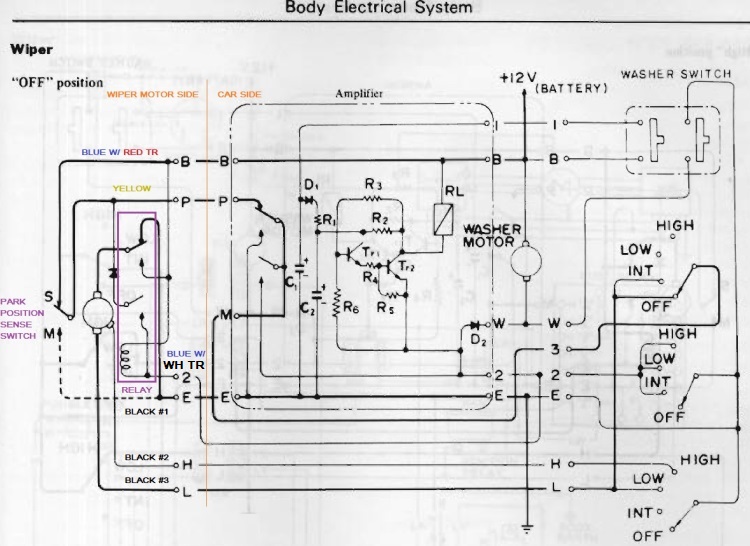
Slow windshield wipers
The OEM wiper motors get weaker over time due to age. There are no direct motor replacements or reproductions known to be available at the time of this writing. There are very close replacements that require some adaption. For a 1978 280Z, I used a readily available replacement Cardone 85-1423 (also OE numbers 43-1423, 76505SX0A01, 76505SR3A01) motor first used on the 1992 Honda Civic and many other Honda/Acura cars in the following decade.
You'll have to remove the wiper arms (unscrew 2 nuts at the shaft and then the arms pop off) before removing the cowl vent cover. There are 4 bolts that hold down the wiper motor mounting bracket. 2 bolts are on the top visible when the cowl vent cover is removed and 2 are at the bottom inside the cowl compartment, one on each side. They are readily accessible with a socket wrench with a 12" extension shaft. Then there is a single nut that attaches the wiper arm to the motor that needs to be removed then the entire motor and bracket assembly comes out easily.
The rubber "bag" that encloses the wiper motor usually can be salvaged if it's still pliable as was in my case. I cut the pigtail connector from the firewall at the point where the wiring enters the "bag" before pulling the motor out. Remove the staples that seal one side of the bag and then carefully pull out the motor. The Honda replacement motor already has the same notched output shaft so the only modification that has to be performed is on the OEM motor bracket. The bracket needs to be notched out on the motor side slightly using an angle grinder so the Honda motor mounts flush to the bracket as you can see somewhat in the following photo. Once flush, center the Honda motor shaft in the bracket hole and mark where the 3 mount bosses make contact to drill new holes. The 3 OEM motor mount holes do not line up with the Honda motor. Once the bracket is prepared for the Honda motor, simply slide it back in the rubber "bag" and bring out the wires where the old one did. Use a normal desk stapler to reseal the open end of the rubber "bag." Then installation is the reverse of disassembly and then hook up the wiring to the OEM pigtail wiring that was cut off using the following diagram and information.

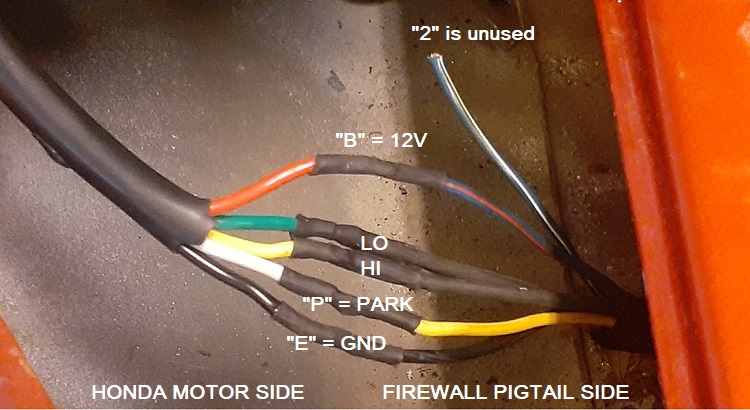
| Purpose | 1978 280Z FSM Reference Name | 280Z motor pigtail | 1992 Honda Civic motor |
| Ground | E (Earth) | Black 1 (connects to OEM motor body) | Black |
| 12V | B (Battery) | Blue with Red tracer | Red |
| High speed control input | H (High) | Black 2 (goes inside OEM motor) | Yellow |
| Low speed control input | L (Low) | Black 3 (goes inside OEM motor) | Green |
| Park position sensor | P (Park) | Yellow | White |
| Motor enable | 2 | Blue with White tracer | N/A |
The 1992 Honda Civic motor white wire for the "Park" position is an output that is 12V when parked, 0V (ground) otherwise. It's NOT an input! Do not wire this to 12V or ground! It's just the output of a switch sensor that actuates when the output shaft is in a parked position. It is used by the wiper switch and associated circuitry to know when to turn off the motor in a parked position after the wiper switch is set to OFF.
The 1978 280Z motor pigtail has 1 extra wire labeled as "2" in the FSM (Blue with White tracer) that controls a relay attached to the original wiper motor. This relay is basically superfluous and can be deleted. All the relay does is enable the motor to be driven by the harness and disconnects it otherwise. The intermittent wiper controller and switches are all inside the car dashboard. The 1978 harness has 3 wires to the OEM motor itself that are all black, unfortunately. You can trace 2 of the motor black wires to the pigtail connector. Those 2 wires are the High and Low speed control inputs, you would have to either use a DMM or temporarily jumper to the new motor to determine which black wire is for which speed. There is a 3rd black wire on the pigtail connector that leads to the OEM motor body and is the Ground connection. You also might be able to tell which wire is ground out of the 3 black wires based on the wire insulation shine; the 2 motor wires have a matte appearance and the ground wire has a glossy appearance.
On a final note, be sure to test the motor before installation! Just stick a piece of tape on the output shaft so you can observe the movement to verify correct operation. The output shaft only spins continuously in one direction slow or fast. Intermittent is a slow rotation then a pause at the parked position.
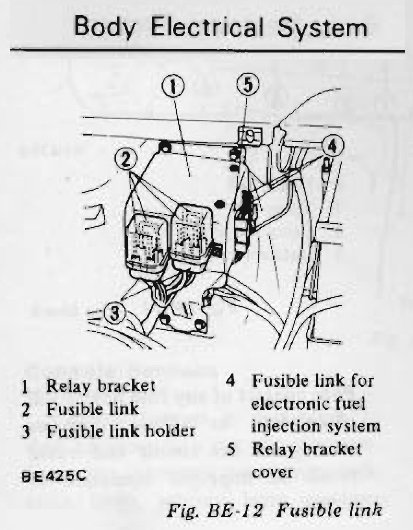
Fusible link upgrade
The white plastic fusible link covers are hard to find to replace. The fusible links sometimes are the cause of intermittent electrical and even ignition problems due to corroded and weak contacts especially if the cover is missing. Consider replacing with a fuse block and upgrading the wiring. Fusible links look like a piece of wire but do NOT replace them with plain wires! A fusible link is a special piece of wire designed to melt at a certain maximum current very much like a slow blow fuse.
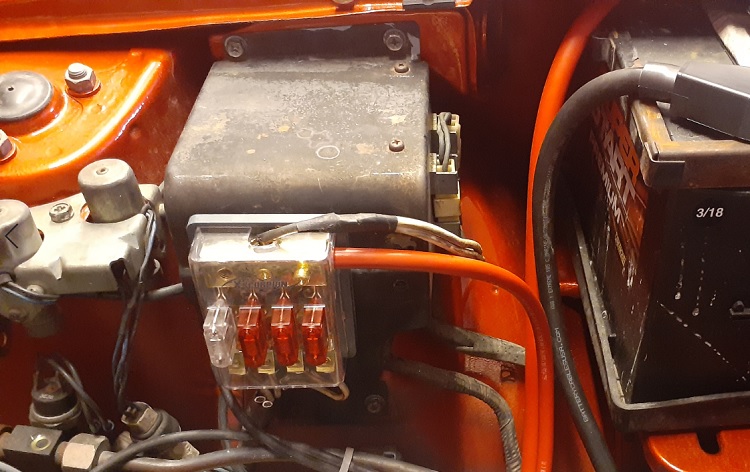
For a 1978 280Z, there are 4 white wires with red tracers leading to the fusible links that would be cut off and attached to individual MAXI fuses. Be sure to keep track of which wire goes to the Black fusible link that is rated for 80A and leads to the alternator BAT terminal. The rest of the white wires with red tracers attach to Brown fusible links that are 60A rated and feed the rest of the car's electrical system. The other 4 white wires without tracers on the other side of the fusible links are 12V and eventually lead to the 12V battery terminal. These wires are actually spliced together to a single wire of the same gauge inside the harness leading to the starter solenoid 12V terminal. Just cut the white wires off at the end of the harness near the fusible links, heat shrink the ends and forget about them. I replaced the white wire with a single 2 gauge red wire between the starter solenoid 12V terminal to the new MAXI fuse block as you can see in the following picture. I use a 4 MAXI Fuse block populated with three 60A fuses (red) and one 80A fuse (clear). You can get custom made wires with a eyelet attached to one end from any number of vendors who supply custom made battery cables. Also there is a 12V lead to other fusible links on the side that are exposed. I just connect their 12V supply to the MAXI fuse block 12V line.
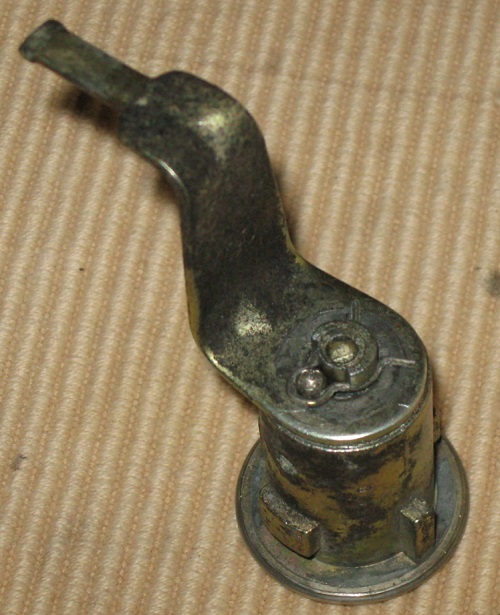
Loose lock cylinder arms
Over time with repeated use, the lock cylinder arm gets loose on the shaft making it difficult if possible at all to lock and unlock the door. Rather than replacing the cylinder and arm completely, it can be repaired by drilling a small hole and inserting a small screw through the arm base that lines up with the notch in the shaft. This method fixed both of my 280Z locks!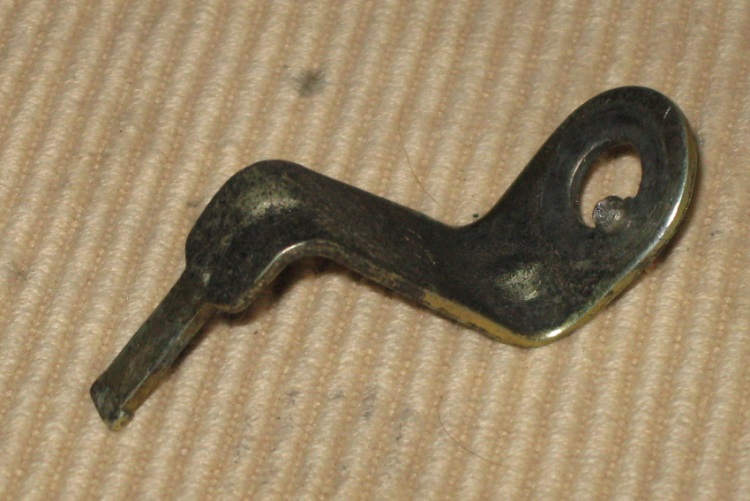

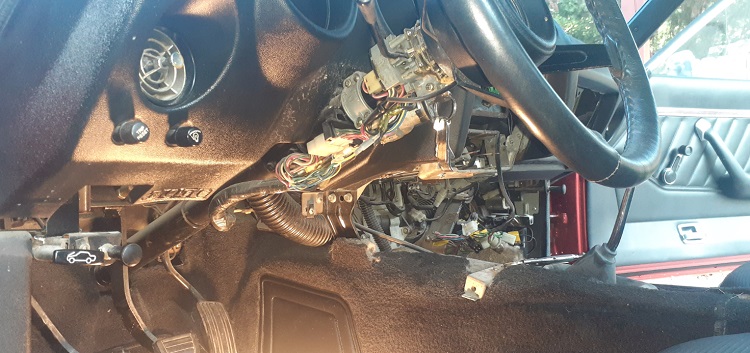
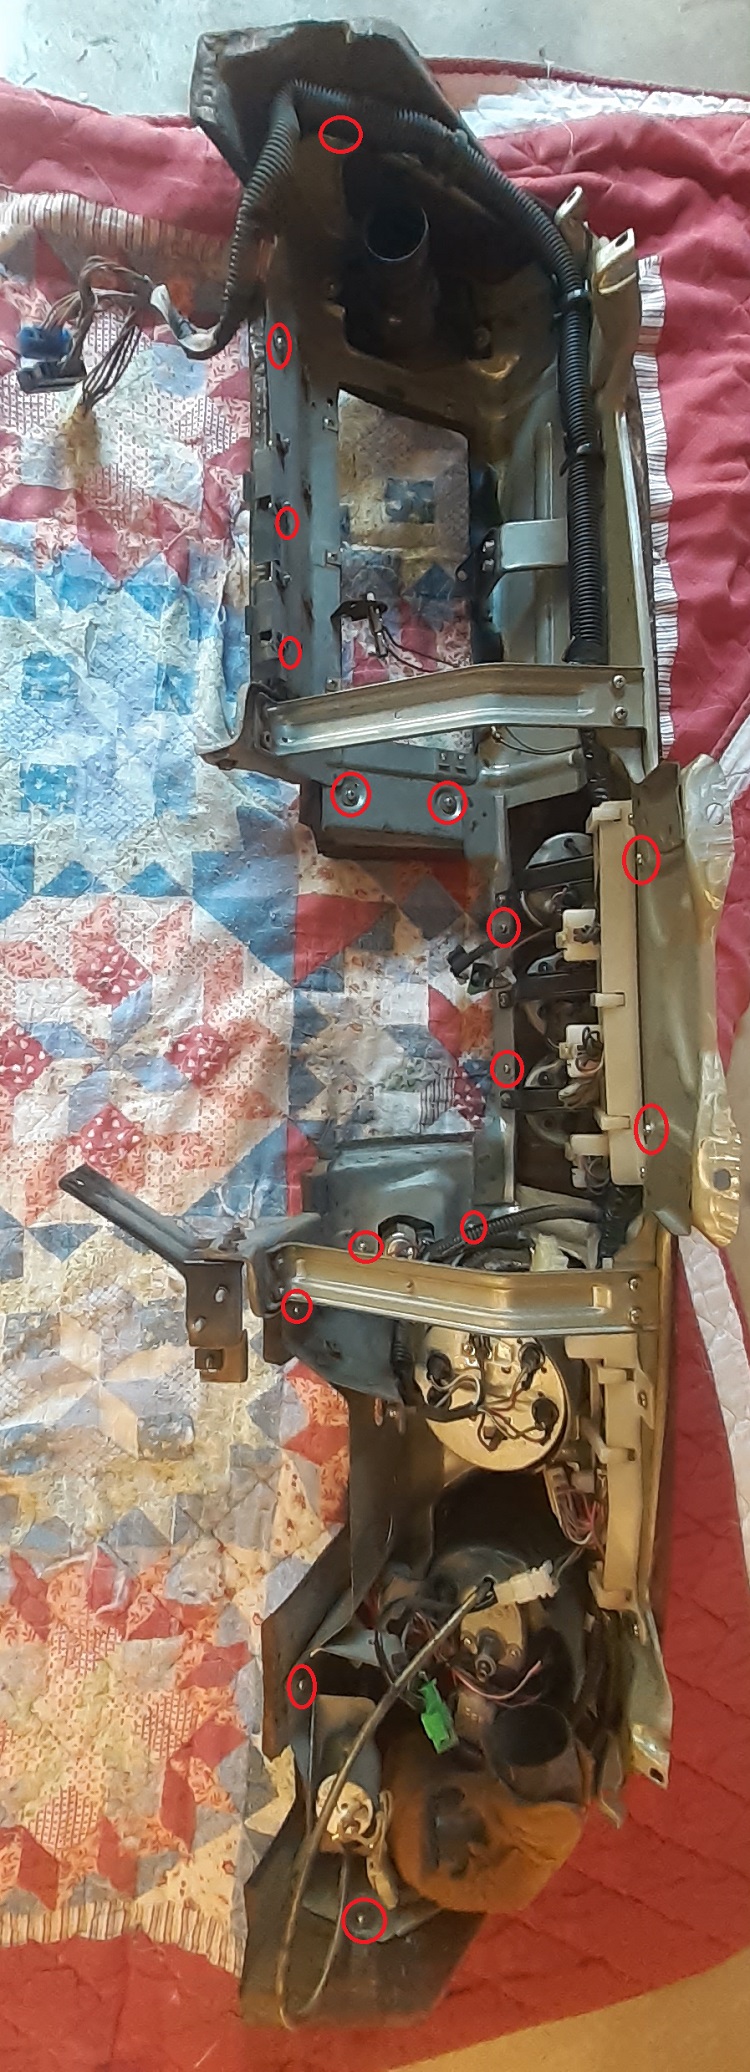
Dashboard replacement
Vintage Dashes out of California was reproducing 280Z dashboards and I got my hands on one in 2020. If you need a guide for how to remove the old cracked dashboard, here is how I did it.
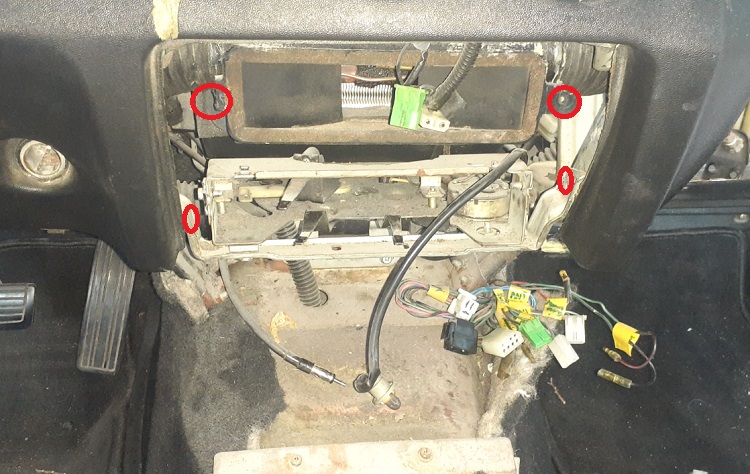
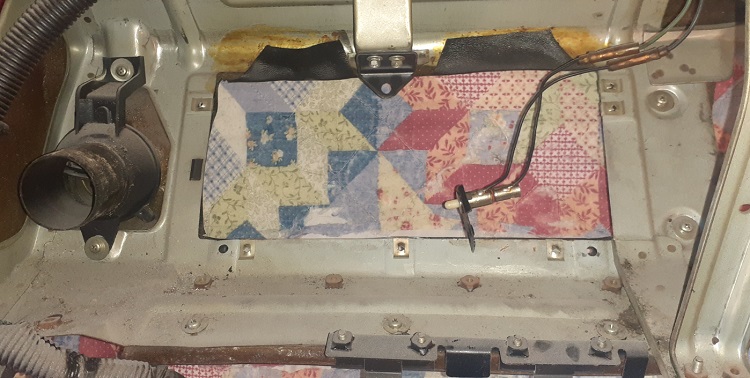
First the center console will need to be removed. There's 3 screws inside the armrest compartment and 2 on the sides near the gear selector and 2 near the ends around the radio. There are plenty of write ups on how to do this. Then disconnect the radio and other wiring to the center console. Most of the connectors are unique so it's hard to mix them up but label them if you need to. Also remove the center dash bezel by removing the 4 philips screws on the side edges. Then you will see the following picture and need to remove 2 brackets on the sides that attaches the A/C vents to the dash.
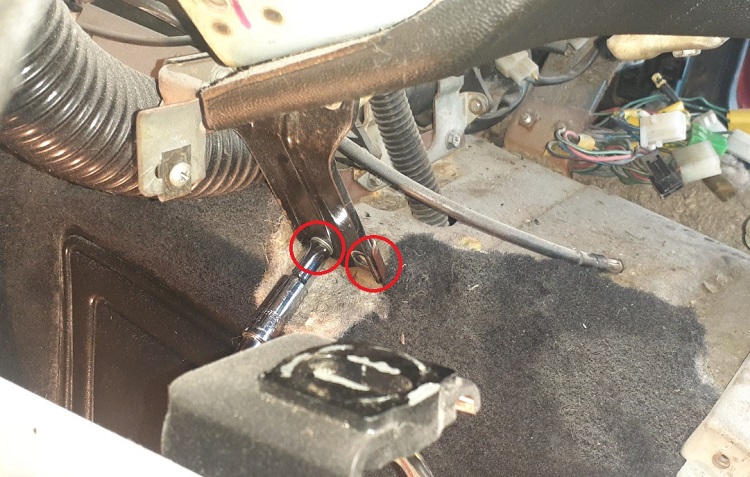
Next the steering wheel and column will need to be dropped. You do not have to remove the steering wheel. The steering shaft has a U-joint just past the firewall so it can drop down without any damage.
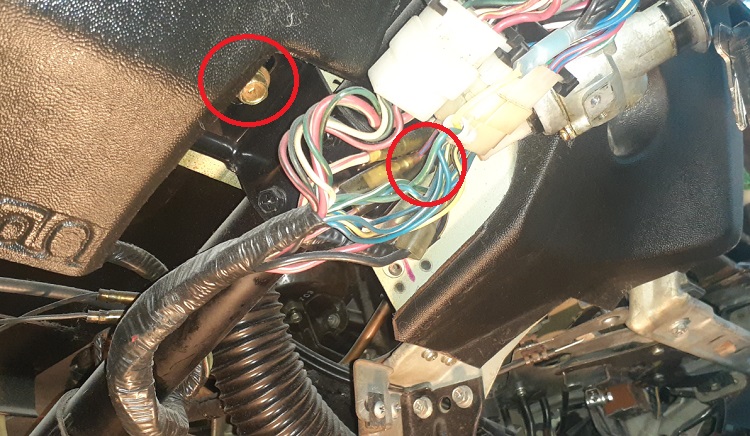
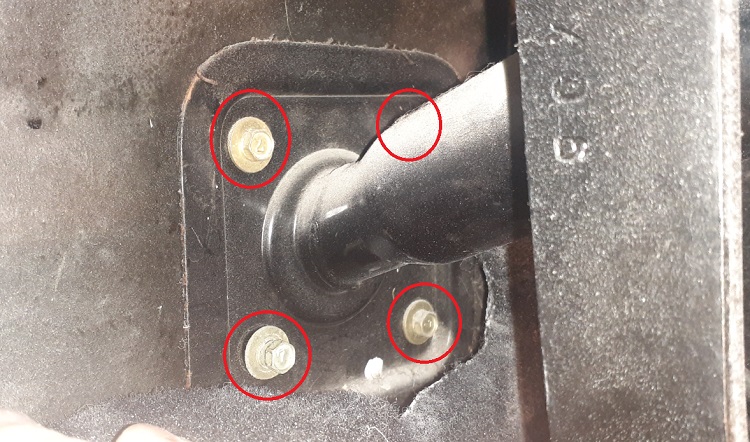
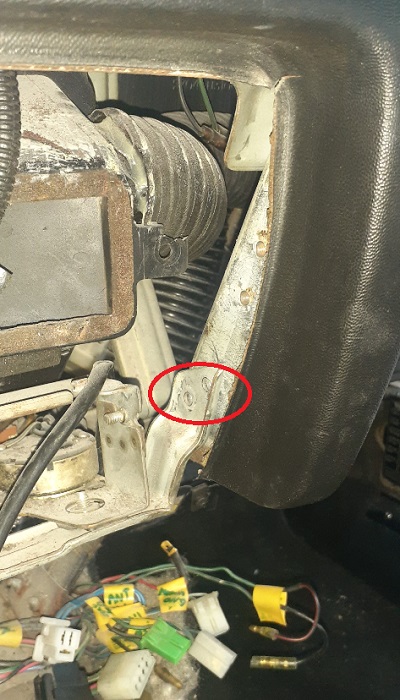
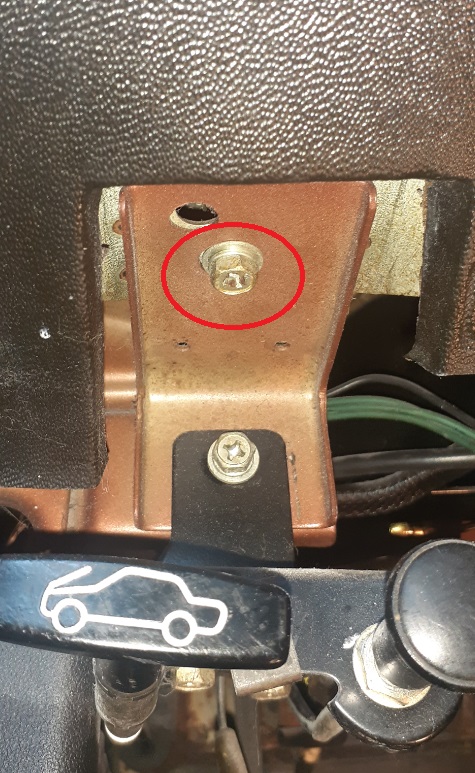
There is one bolt on each end of the dashboard at the bottom corner that attaches to the body. And there are 2 on each side of the center transmission tunnel that attach to the dashboard frame. The following pictures only show the locations on the left side, but it's similar on the right side as well.
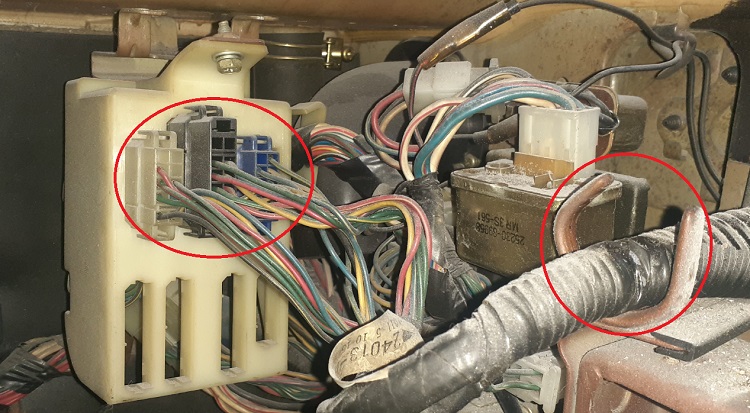
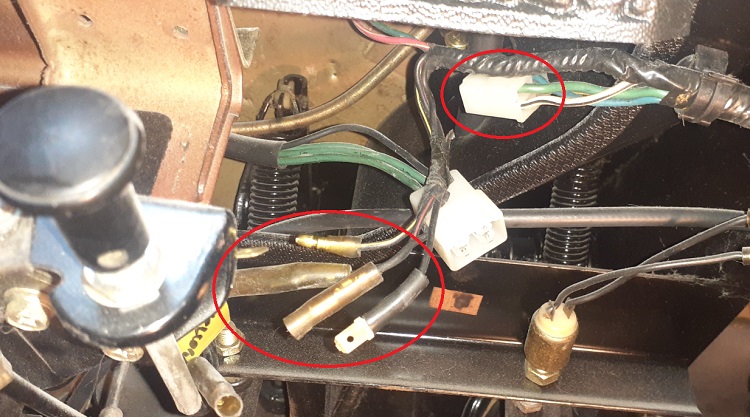
Disconnect the wiring harness on both the left and right sides. The wiring on the left side mostly has unique connectors so they can't be mixed up but you can label if you need to. The right side connectors to the firewall are definitely unique connectors and do not need to be labeled.
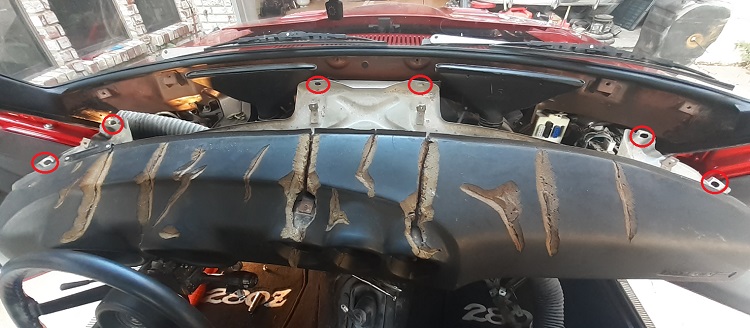
At the top of the dashboard near the windshield is a metal bezel with 4 screws that need to be removed to reveal 6 bolts that attach the top dashboard frame to the firewall. Use a socket wrench with a 12" shaft extension to remove those 6 bolts. This can be done easily even with the windshield in place. At this point, the dashboard should come out fairly easily.
The following photo shows all the screws that I remember removing that attaches the dashboard foam pad to the metal frame. There may be more near the top corners that I forgot to highlight. The glovebox door, all the gauges, A/C vents, and trip reset knob should be removed before taking off the foam pad. The speedometer and tachometer gauges each have a small screw in the front and a large screw in the rear that attaches the back of the gauge to the frame that need to be removed.
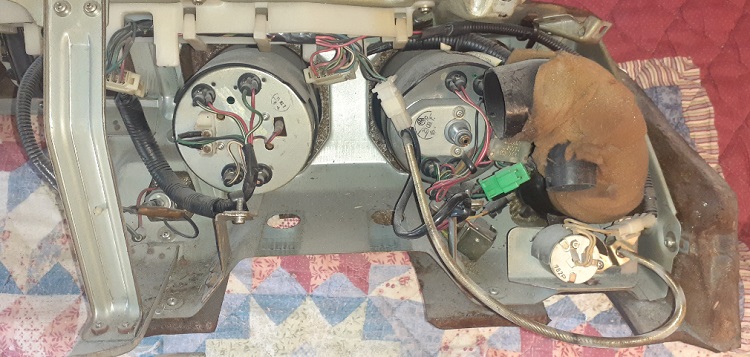
Replacement and installation is the reverse of disassembly. This is also an opportunity to upgrade the A/C blower motor easily while the dashboard is out.
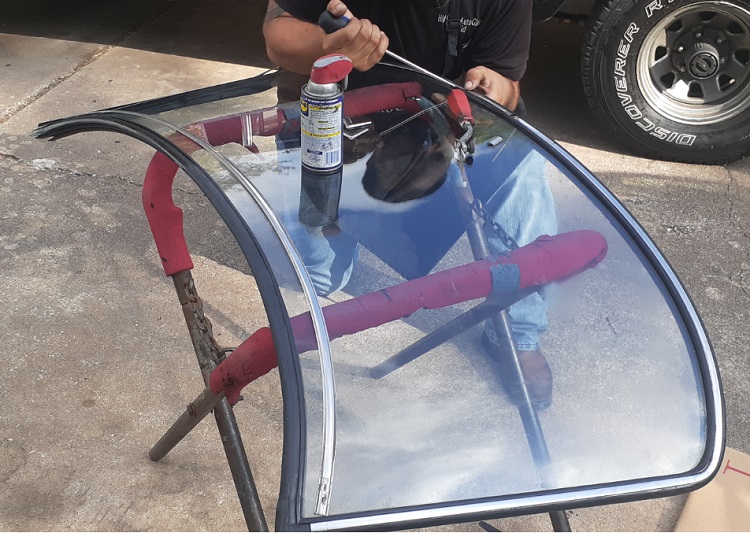
Replacing front windshield and rear hatch window weatherstripping
It may seem tricky or hard to install the weatherstripping, but it's actually easy once you know the tricks of the trade. Unfortunately this knowledge is dwindling since cars no longer have stainless window trim nowadays and it is difficult to find a glass installer who knows the old art. The following information is how you do it properly for any first generation Z car.
Removing the glass is not hard. The weatherstripping holds the glass in place around the perimeter of the glass with a lip that wraps around the sheet metal. Use an utility knife to cut off the lip from the inside and the glass pops out easily. The stainless trim can then be removed, but if the rubber has hardened then you can cut off the lips that holds the trim in place to pop them out.
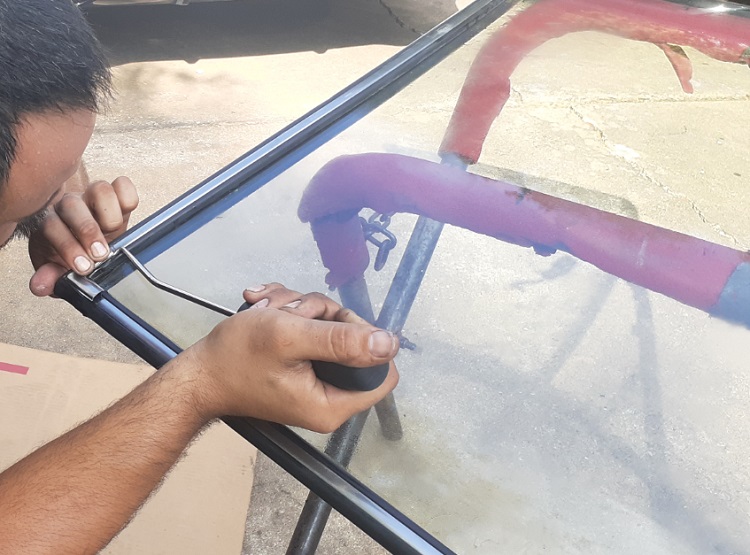
To prepare to install either the front or rear glass, first attach the new gasket around the glass perimeter after removing and cleaning off the old gasket from the glass edges. Don't use any weatherstripping adhesive. It's not necessary for the Z and I've not had leaks with the replacements. Before installing the windshield with the new gasket, insert the stainless trim in the gasket while the windshield/gasket are OFF the car. If you install the glass and gasket in the car then it's already tight and next to impossible to install the stainless trim afterwards without damaging the gasket lips that hold the trim in place. There are glass gasket installation tools that look like a screwdriver handle with hook ends used to lift the gasket lips to help with installation of the stainless trim. Use soapy water or WD40 to make the gasket and lips slippery while installing the trim piece by piece.
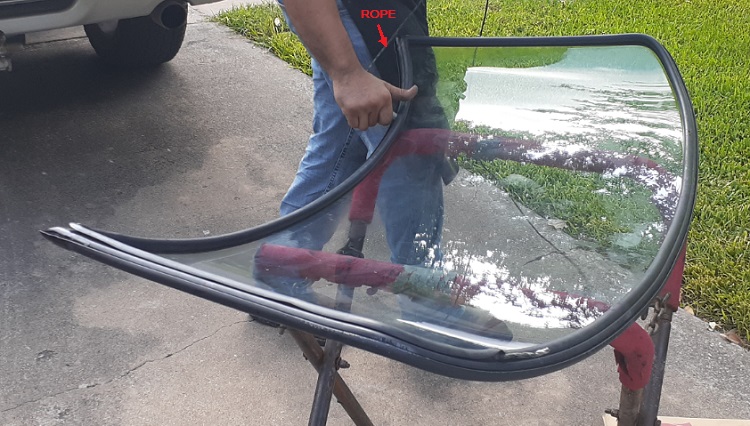
Now with the glass, gasket and stainless trim all assembled, it is ready for installation on the car. Use a strong rope about 3/16" thick and insert it as deep inside the lip of the gasket that will wrap around the car's metal frame. The start/end of the rope probably should be located at the lower left corner of the front windshield, and the upper center for the rear hatch glass. Once the rope is in place, the entire glass/gasket/trim assembly is placed on the car as deep in the frame as possible. Carefully pull the rope back towards the inside of the car to bend the gasket lip outward so that it grabs the edge of the sheet metal where it wraps around. Push the glass down as the rope pulls out and work your way around the perimeter. It only takes about 15 minutes when done right!
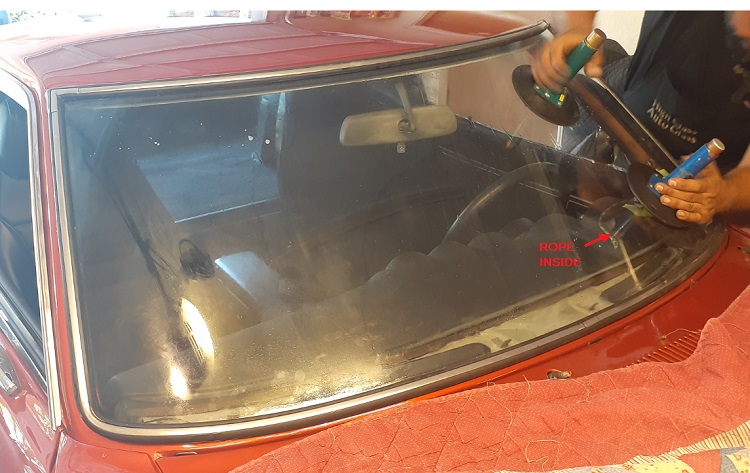
You can see in the following photo the rope is being pulled evenly on both sides of the rear hatch at the bottom of the glass to finish off the job.